|
|
Create a Slide Show with VBScript |
I'm going to assume you have a collection of pictures and/or text and/or sounds. Maybe just pictures or just text, or maybe pictures and sounds (like recorder narration). It doesn't matter. Heck, if you had a movie file, you'd show the movie and you wouldn't need to put a presentation together!
What's important is to start off with good generic inputs. This means high-quality pictures, plain old text (not MS Word documents!) and standard uncompressed audio files. If you have input data like this, you can convert, compress, resize, and basically do whatever you need to do to get your material into almost any presentation software out there.
To keep things organized, your input files should always be given matching base names. For example, if you have a picture named "flower23.jpg" and you have a sound file with some recorded narration concerning that flower, you should name that sound file "flower23.wav" (or "flower23.mp3" or whatever is appropriate). Likewise, any written information about that flower should be saved in a text file named "flower23.txt". You get the idea. With matching file names, it becomes possible to automate the process of building all your original files into a unified presentation.
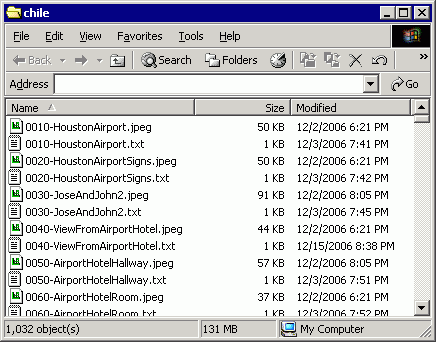
Ooh, ooh!! The most important thing. Sort of. Don't use spaces in your file names. Use "mixed case" (like the picture below) or use dashes or underscores. Although spaces are actually permissible, they require special handling on the web and in some utilities and batch commands. Your chances of success go up if you avoid spaces. But that's just my advice. You do what you want.
 Define a Presentation Order
If you have pictures, they are either something you've made (good for you) or they're a collection of digital camera photographs. Either way, you need to rename them so they'll sort into the order you want them displayed. Digital camera photographs tend to be named sequentially, so maybe you've got that done for you. If not, well, you're going to be better off adding some numbers to the beginning of your file names so it will be obvious what order things should be presented in.
You can either rename all your files by hand or you can get a little help from a file numbering script I wrote. Just drag your pictures one-at-a-time onto the script and it will add a decade-incremented 4-digit number to the beginning of each file name. For example, "flower23.jpg" might get renamed "0010-flower23.jpg".
Unfortunately, the file numbering script treats all files in the
same folder the
same. It doesn't understand about related file names. So you can
use it like I do to put your pictures in the right order. For all your
related text or sound files, you're going to have to be clever.
On your own. Without me. By yourself. Well, I could tell you about a
batch command I use to automatically generate empty text files for
every picture...
for %x in (*.jpeg) do echo.> %~nx.txt
... but if I told you about that command, 90 percent of you wouldn't
know what I was talking about, and the other 10 percent would know a
better way to do it. So I won't tell you. Forget I said anything at all.
This part is fairly straightforward. Chances are you already have a favorite program that can take a bunch of huge digital pictures and create smaller web-sized pictures from them. If you don't have a favorite, I'd like to recommend IrfanView and XNView. They're both free and can "batch convert" groups of files. You can also get the free command-line "convert" program from ImageMagick.
Of course, I wrote a script that can create web-sized pictures from your original camera files. The best part is that the script understands the "EXIF" information cameras save with the file, so it can automatically rotate your pictures so up is up! That's a LOT better than having to go through all your pictures and manually rotate them. The script uses an ActiveX object called "GFLAx" from XNView. You can download and install it on your computer ahead of time, or let the script do it for you automatically.
If you use the script, drag the folder containing your pictures and drop it on the script. Or run the script and it will ask you to browse to the folder that has your pictures. Same thing. After that, you tell the script what file type your pictures are (typically JPG), what kind of files you want to make (typically JPEG since it has to be different), and how big the new files will be (typically 640 pixels). That's all. The script sets about creating newly-sized and rotated pictures for you. Your original files are never modified.
 By
now you should have web-sized photos (assuming you have any photos at all),
text files (assuming you have any text) and sound files (assuming you
recorded anything). All the related files will have the same base
name and they're all in the right order. Great!
By
now you should have web-sized photos (assuming you have any photos at all),
text files (assuming you have any text) and sound files (assuming you
recorded anything). All the related files will have the same base
name and they're all in the right order. Great!
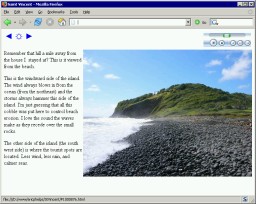
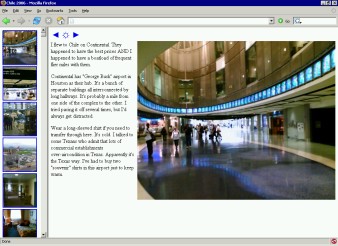
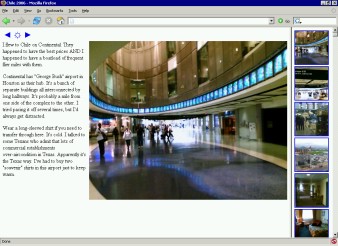
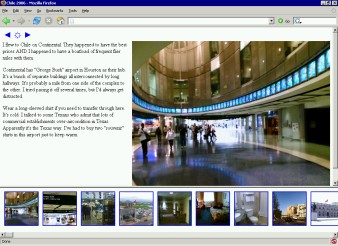
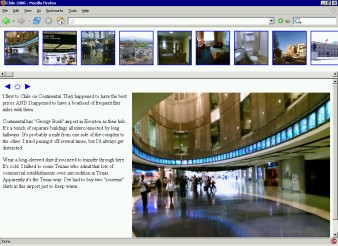
Now you can use a script to create a slideshow. The slides created by this show will merge a related picture, text, and sound file into a single web page. As you can see from the small screenshot here, your picture (if you have one) shows up on the right side of the page, text (if there is any) shows up on the left side, and your sound file (if there is one) starts playing automatically in an embedded player at the top right of the page. Navigation buttons for "Back", "Home", and "Next" (in that order) are on the top-left of the page. If you click the screenshot image here, you'll be taken to that slide in the show (for as long as I have that show on the web).
You just need to tell the script what folder your content is in (either by dropping that folder on the script or by browsing to it), and what file extensions are used by your picture, text, and sound files. It creates the web page that ties everything together.
Oh yes... One other feature. Maybe you want to allow people to click the picture on the slideshow page to get a high-resolution printable version of the picture (like the original camera photo file maybe?). Or maybe you have a zip file with lots of other data about the picture. No problem. You can specify what file extensions should be linked to your pictures and that will all be set up for you as well. If you visited the actual slide show linked to the picture here, maybe you tried clicking the picture. No? Try it!
Each slideshow page contains a small piece of JavaScript that allows you (if you have JavaScript enabled) to go to the next slide by simply hitting your keyboard "Enter" button. Likewise, you can go to the previous slide by hitting the "Backspace" button. If JavaScript isn't enabled (or if you don't like using a keyboard), you can always use your mouse to click the appropriate slide navigation buttons.
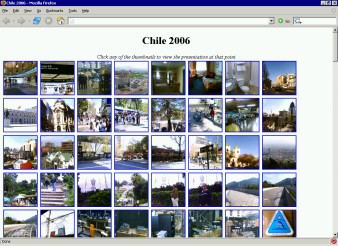
The only bad thing about a simple slide show is that it is "serial": It goes from one slide to the next. If you want to easily jump to the middle for some reason, you need some kind of an index. If you want to create a text index page, you can do that. Have a ball. Me, I'm lazy. Images can be automated, so I'm in favor of automating the creation of the index page based on thumbnails of the images. To do that, of course, you're going to need thumbnails.
You can use the same image editing programs I mentioned before to make thumbnails, but the easiest way is to use the script I wrote to automatically create thumbnails. This script also uses the "GFLAx" object for image manipulation, so it can also make sure your thumbnails have the correct rotation. You use it pretty much the same way as the other script: Drag and drop a folder on the script, tell it what type file your picture is, what type of thumbnail you want to make, and what size the thumbnail should be. The thumbnails are automatically center-cropped to be square so they'll line up better on an index page. I recommend you make your thumbnails as "GIF" or "PNG" files so there's no confusing them with full-sized or web-sized images, but that's really up to you.
So now you have a complete functioning slideshow and some thumbnails. You need to put them together! Naturally, I have a script to automatically create a thumbnail index page. I use the GFLAx object on this script to tell how big the thumbnails are, but if the script can't get GFLAx to work, the script falls back to juat asking you how big the thumbnails are. All you need to tell the script is what folder everything is in, what file type your thumbnails are, and what file type your main content is (typically "htm" or "html" because it's a web page). Oh yes, one more thing. You tell the script whether to build a standalone index page or whether it should build a framed presentation that will allow you to slide through the thumbnails on any of the four sides of the slide show.
The simplest case is if you only have some pictures you want to show off . You don't really want a "presentation". For that, you make thumbnails of your original photos, then run this thumbnail index page script. That's all. Two steps. People can look at the thumbnails, decide which one they want, then click the thumbnail to get the big picture.
Below are screenshots of a presentation showing the five different thumbnail indexes that can be created with the thumbnail index page script:
Lost? Look at the site map.
Bad links? Questions? Send me mail.