Web Site Blocking with PAC
Files
|
|
Overview
You don't need to spend money to stop
your kids (or your employees or coworkers) from accidentally browsing
to a web site that's going to cause embarrassing problems. You
don't even need to install a new program. The magic is done with a file
called a "Proxy Auto Configuration" (PAC) file.
A PAC file contains some JavaScript code
that lets your browser know what route is has to take to connect to
different sites on the Internet. For most home users, the browser
normally connects directly to a web site. However, it's also possible
to have the browser connect to a "proxy" computer that gets the web
content and passes it back to your browser. If you connect through a
proxy, the proxy can act as an intelligent "man in the middle",
blocking pornography, gambling, advertising, and viruses. Sounds great,
huh? What's the catch?
Well, the companies that control proxy servers usually charge you money
to use those proxy servers. That takes all the fun out of it!
Now that you understand a bit about
proxies and PAC files, maybe you see a way out! What if the PAC file
told your browser it could connect directly to a site like
www.disney.com, but told your browser it had to use a non-existent
proxy to connect to www.sex.com? Then every time you tried to browse to
www.sex.com, your browser wouldn't find the proxy, so couldn't make the
connection! That is exactly what happens. Well... Almost exactly. Which
is to say... not exactly. What really happens is that the PAC file
tells your browser to connect to your own PC instead of connecting to
the "bad" web site. Which accomplishes the same thing.
The PAC file has to contain (built in to
the JavaScript) all the "bad" words you want to filter and block. The
filtering is done to the URL, not to the web page body. So a
page like this (which has bad words in it) would get through
because the URL doesn't
have any bad words in it. Okay? Nothing is perfect. But the good part
is that because the words are checked against the entire URL, that
means you can't bypass it by searching through Google and
viewing Google's cached results.
The list of bad words isn't just words:
The words are buried pretty deep in JavaScript code. But it is
plain-text, so you can add and subtract words with nothing more than
the Windows "notepad" program. Here's a few (tame) lines from the PAC
file:
BadURL_Parts[i++]
= "busty";
BadURL_Parts[i++] = "celeb";
BadURL_Parts[i++] = "centerfold";
I bet you'll have no problem figuring out how to modify those words to suit your own needs. You just open up Notepad (Under "Start", "Programs", "Accessories"), then drag the PAC file (named "proxy") into Notepad. Save it when your done. Your computer may freeze for a few seconds after you save the file, and you may have to restart your browser to make your changes active, but that's all there is to it.
Automatic
PAC File Download, Installation, and Configuration
The PAC
file script will automatically download the most
recent pac file from hostsfile.org.
It will put the downloaded file in the same folder as your
"hosts" file, set up your local intranet zone and
proxy caching, and configure Internet Explorer to use
the new PAC file. The script will
only set up "LAN"
settings (DSL, broadband, cable, or satellite) and will not affect
dialup connections. It will only set up the Internet Explorer browser
and won't affect FireFox or any other browser.
Manual PAC File Installation
If you need support for dialup or other browsers, you can use the above script to get most of the work done, but you'll need to follow the "dialup" and "other browsers" part of the installation instructions below (green text) to finish the job.| 1.
Where to put
the PAC file Most people who discuss PAC files are kind of vague about where to put them or what to name them. I'm going to be specific. The PAC file should be named "proxy" with no file extension and it should be in the same folder as your "hosts" file. Why? This puts it in a folder normally reserved for system files (which is good, because this is a system file), the lack of a file extension makes it look like all the other files there (so it won't attract attention), and the lack of a file extension makes it difficult for kids to open. The folder we are discussing is located here:
|
 |
2. Configure your browser to use the PAC file In the Internet Explorer menu, select "Tools", then "Internet Options", then go to the "Connections" tab. Click the "Settings..." or "LAN Settings..." button depending on whether you have broadband or a dialup connection. If you aren't sure, you can do both. |
 |
| XP or Vista | file://C:/Windows/system32/drivers/etc/proxy |
| 2000 | file://C:/WINNT/system32/drivers/etc/proxy |
| 98/ME | file://C:/Windows/proxy |
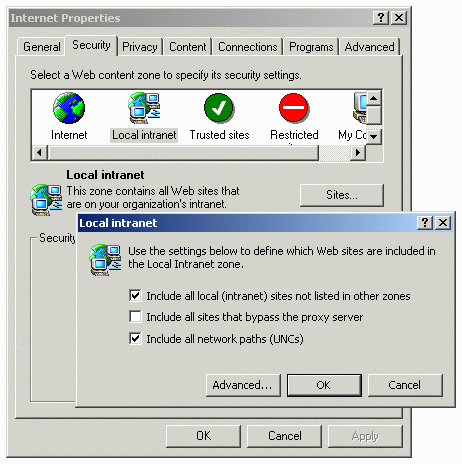 3.
Define your local intranet security zone 3.
Define your local intranet security zoneMicrosoft wrongly assumes that if there is a proxy (even one that doesn't exist), anything that doesn't use the proxy must be in your local intranet. Wrong! That would be a very bad thing from a security point of view! Typical Microsoft. We need to fix that. In the Internet Explorer menu, select "Tools", then "Internet Options", then open the "Security" tab. Select the "Local intranet" icon, then hit the "Sites" button. Remove the check from the "Include all sites that bypass the proxy server" box. |
4. Disable Proxy Caching When IE sees that a proxy is needed for a web site, it uses the same proxy again later for the same web site. Normally, that's a good thing; a time-saver. For our purposes, it's ruinous! If I do a Google search for "sex", I want the PAC file to block it by directing the browser to a bad proxy. If IE remembers that proxy, that means it will continue blocking Google, even if I later search for "flowers". We need to force IE to look in the PAC file every time to decide whether a proxy is needed or not! If you want to do it manually by making a registry change, you can read http://support.microsoft.com/?kbid=271361. If you do, you'll end up with a result like this: 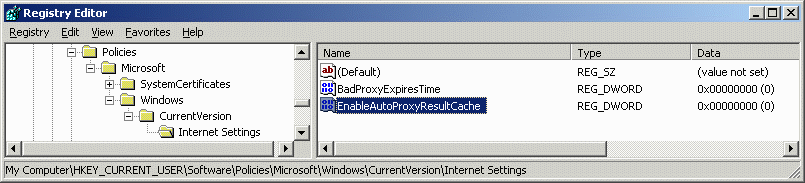 Notice that the registry section shown is for the current user. That means you'll have to change this setting for all your users. Generally this means you'll have to actually log in as every user and effect this setting. Of course, you could write a script to do it and put it in the "All Users Startup" or in the HKLM run section, but we're talking about manually installing things here. |
5. Empty your browser's cache This is really optional. If you've been to a site you're trying to block, the page and pictures are in your cache. If you go there again, even if the PAC file blocks it, your browser could show you the old data.
|
6. Set up a dummy web server The only reason you may need to do this is if you don't like to see error messages in your web pages! The easy way to eliminate the error messages is to install a small specialized web server or proxy server on your PC. Each time your browser tries to connect, the specialized program gives the browser a small transparent image rather than an error message. Problem solved! A great specialized web server is "Homer". Naturally, I've made a Homer auto-installation script that will download and install Homer correctly for you. The great thing about Homer is that in addition to returning a blank image to replace the undesirable image or error message that might have originally displayed, Homer also has a log to show you what URLs are being blocked. |
Resources
HostsFile.org PAC files and Hosts files
http://hostsfile.org/
John Lo Verso's "Bust Banner Ads with Proxy Auto Configuration" web
page:
http://www.schooner.com/~loverso/no-ads/
Sheryl Canter's "Kill Internet Ads with HOSTS and PAC Files" article:
http://www.sherylcanter.com/articles/oreilly_20040330_HostsPac.php
Homer LocalHost web server (prevents visible error messages
when you block sites)
http://www.funkytoad.com/
"WebWasher Classic" Internet filter program is free for
personal use:
http://www.cyberguard.com/products/webwasher/webwasher_products/classic/index.html
Open Source "Privoxy" is a true proxy that can handle multiple
computers:
http://www.privoxy.org/
Pyrenean's "eDexter" local image web server. "DNSKong" personal DNS
server:
http://dnskong.com/
Internet Filter's list of over 400,000 known porn web sites:
http://research.vision-options.com/research.php
Lost? Look at the site map.
Bad links? Questions? Send me mail.